But what if you only have a built-in flash, or forgot to bring your ‘real’ diffuser? I’ll show you how to build a DIY flash diffuser from stuff that you can find in a kitchen or a grocery store. It’s a one-dollar project, but you can still achieve beautiful, smooth lighting in your photos with this DIY diffuser setup. [ExpertPhotography is supported by readers. Product links on ExpertPhotography are referral links. If you use one of these and buy something, we make a little bit of money. Need more info? See how it all works here.]
What Is a DIY Flash Diffuser?
The flash diffuser is one of the most basic yet powerful light modifiers. It attaches to your external flash and increases the surface where the light originates from. This allows for softer, less unidirectional lighting. Even if you only diffuse your built-in popup flash, it will be incomparably less harsh and distracting.
What Type of Diffuser Is Best for Macro Photography?
In macro photography, you rely on artificial lighting more than in most other genres of photography. Thankfully, you don’t need to carry huge softboxes and other large light modifiers. For portraits and some products, you would need those sizes. For macro, not so much. As your subjects get smaller and smaller in size, you can use smaller lights and achieve the same relative effect. So, to create an efficient macro diffuser, you don’t have to think big.
How to Build Your DIY Macro Diffuser
This diffuser is very DIY. I experimented with more advanced designs but dropped them ultimately. The goal here is to create the cheapest, simplest, and most effective macro diffuser. You can adapt and transform the idea to fit your gear and preferences because the key is the concept. I made this one for the pop-up flash on a Canon 1300D camera. You can use your external flashes, too.
What You’ll Need to Make a DIY Diffuser
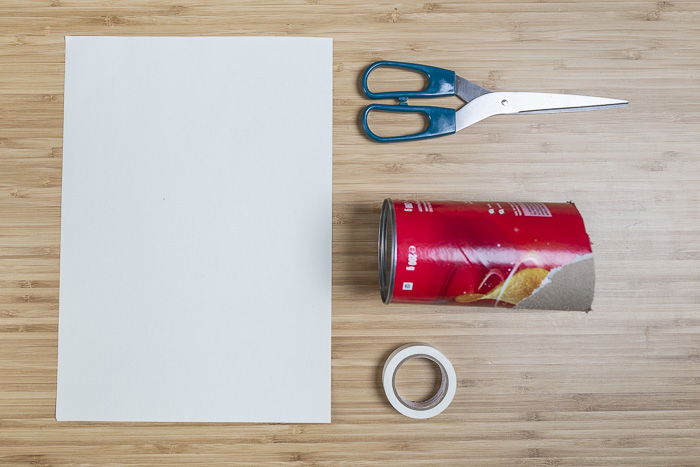
As I mentioned, this list is very flexible, utilise what you can find. Here is what I used:
Some white paper White colored adhesive tape A hollow tube (I used an empty chips can) Scissors
The chips can, in my case, was reflective on the inside. I advise you to choose similarly because inner reflections further soften the light. You can also cover the inside in aluminum foil.
How to Assemble Your DIY Flash Diffuser
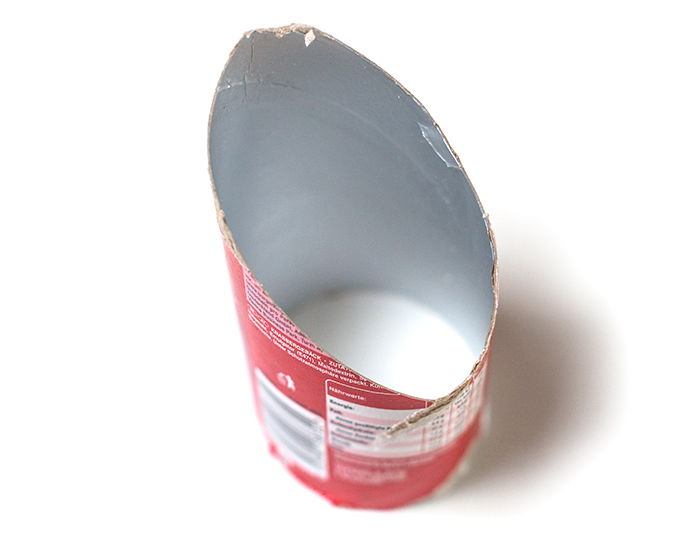
Ideally, the tube of our DIY diffuser should be around the same length as the lens. If it’s too short, some of the light will be shaded by the lens. If it’s too long, it will fall behind the macro subject. So, first, cut the tube to be the length of the lens. On one side, leave it longer than the lens to direct the light downwards. On the opposite side, cut it, so it’s the same length as the lens.
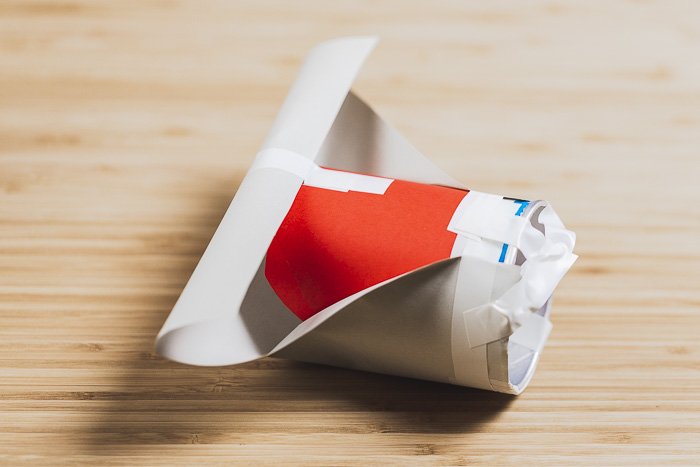
If you need to, wrap the inside with aluminum foil at this stage. I also covered it in red paper on the outside to disguise the brand of the chips. Then, grab a piece of white paper. Fold it in half and tape it to the tube. It doesn’t matter if the paper covers the sides or not. Try to tape so that the paper follows a smooth curve, and there are no sharp edges.
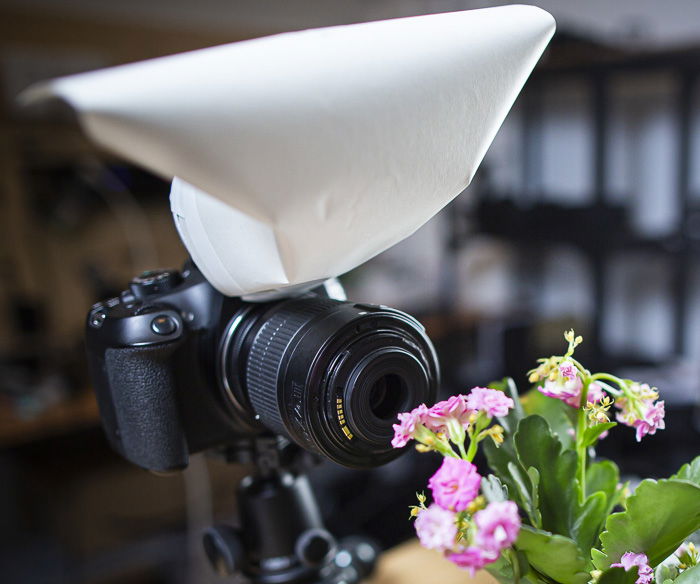
Now, open up the pop-up flash on your camera. Tape the diffuser to the flash, aim for minimising wobble. If you’ve done it well, it should look something like this:
What Can You Expect From a DIY Flash Diffuser?
Surprisingly, a lot. In macro situations, a piece of paper and a can of chips transforms the behaviour of your flash completely. Without it, you only have direct, harsh light coming from your pop-up flash. But once you attach this photography diffuser, it transforms it to be flattering, smooth, and more balanced. Let me show you a couple of examples.
Conclusion: Street Photography Quotes
Macro photography offers plenty of opportunities to experiment. This DIY macro flash diffuser costs only a few dollars and a few minutes to make, so why not build it? Doing small projects like this keep your creativity and inspiration fresh. All this makes for more enjoyable photography and better photos. Looking for more flash photography tips? Check out our posts on using wireless flash trigger or how to improve your bounce flash photography next!


title: “How To Make An Easy Diy Flash Diffuser For Macro Photography” ShowToc: true date: “2023-02-07” author: “Kathleen Fatica”
But what if you only have a built-in flash, or forgot to bring your ‘real’ diffuser? I’ll show you how to build a DIY flash diffuser from stuff that you can find in a kitchen or a grocery store. It’s a one-dollar project, but you can still achieve beautiful, smooth lighting in your photos with this DIY diffuser setup. [ExpertPhotography is supported by readers. Product links on ExpertPhotography are referral links. If you use one of these and buy something, we make a little bit of money. Need more info? See how it all works here.]
What Is a DIY Flash Diffuser?
The flash diffuser is one of the most basic yet powerful light modifiers. It attaches to your external flash and increases the surface where the light originates from. This allows for softer, less unidirectional lighting. Even if you only diffuse your built-in popup flash, it will be incomparably less harsh and distracting.
What Type of Diffuser Is Best for Macro Photography?
In macro photography, you rely on artificial lighting more than in most other genres of photography. Thankfully, you don’t need to carry huge softboxes and other large light modifiers. For portraits and some products, you would need those sizes. For macro, not so much. As your subjects get smaller and smaller in size, you can use smaller lights and achieve the same relative effect. So, to create an efficient macro diffuser, you don’t have to think big.
How to Build Your DIY Macro Diffuser
This diffuser is very DIY. I experimented with more advanced designs but dropped them ultimately. The goal here is to create the cheapest, simplest, and most effective macro diffuser. You can adapt and transform the idea to fit your gear and preferences because the key is the concept. I made this one for the pop-up flash on a Canon 1300D camera. You can use your external flashes, too.
What You’ll Need to Make a DIY Diffuser
As I mentioned, this list is very flexible, utilise what you can find. Here is what I used:
Some white paper White colored adhesive tape A hollow tube (I used an empty chips can) Scissors
The chips can, in my case, was reflective on the inside. I advise you to choose similarly because inner reflections further soften the light. You can also cover the inside in aluminum foil.
How to Assemble Your DIY Flash Diffuser
Ideally, the tube of our DIY diffuser should be around the same length as the lens. If it’s too short, some of the light will be shaded by the lens. If it’s too long, it will fall behind the macro subject. So, first, cut the tube to be the length of the lens. On one side, leave it longer than the lens to direct the light downwards. On the opposite side, cut it, so it’s the same length as the lens.
If you need to, wrap the inside with aluminum foil at this stage. I also covered it in red paper on the outside to disguise the brand of the chips. Then, grab a piece of white paper. Fold it in half and tape it to the tube. It doesn’t matter if the paper covers the sides or not. Try to tape so that the paper follows a smooth curve, and there are no sharp edges.
Now, open up the pop-up flash on your camera. Tape the diffuser to the flash, aim for minimising wobble. If you’ve done it well, it should look something like this:
What Can You Expect From a DIY Flash Diffuser?
Surprisingly, a lot. In macro situations, a piece of paper and a can of chips transforms the behaviour of your flash completely. Without it, you only have direct, harsh light coming from your pop-up flash. But once you attach this photography diffuser, it transforms it to be flattering, smooth, and more balanced. Let me show you a couple of examples.
Conclusion: Street Photography Quotes
Macro photography offers plenty of opportunities to experiment. This DIY macro flash diffuser costs only a few dollars and a few minutes to make, so why not build it? Doing small projects like this keep your creativity and inspiration fresh. All this makes for more enjoyable photography and better photos. Looking for more flash photography tips? Check out our posts on using wireless flash trigger or how to improve your bounce flash photography next!
