Ballet Photography Tips
6. Emphasise Movement Using Motion Blur
Motion blur works very well with ballet photography. If you’re a fan of abstract art, you can experiment with blur in a variety of ways. One of the most popular motion blur techniques involves long exposure. Place your camera on a tripod to avoid unnecessary hand movements. Make sure your aperture is high and your shutter speed slow. If you’re new to shutter speed, you can switch to Bulb Mode (B on the Mode Dial). This will allow you to hold the shutter open for as long as you like. You’ll control when your shutter closes. This means you can take photos for 10 seconds, 10 minutes, or any other amount of time.
5. Create a Double Exposure for Extra Creative Results
Double exposure photos are often made up of at least two images that complement each other. You can use this technique to capture multiple movements in one composition. This is a great way to express your subject’s emotions and show off a variety of poses in one photo. Double exposures look complicated. But they’re relatively easy to make. You need at least a couple of photos, Photoshop (or a similar editing program), basic composition skills, and the layer opacity tool.
4. Focus on Details to Make Your Photos Look More Interesting
When you think of ballet photography, you might picture full body shots only. If you stick to one type of angle or position, your photos are going to end up looking dull. Be as flexible as possible when you photograph your model. One way to make things more exciting is to focus on details. Take photos of your subject’s hands, accessories, outfit, shoes, etc. While these photos may not become your favourites, they’ll definitely improve your observation skills and give your model lots of beautiful photos to enjoy.
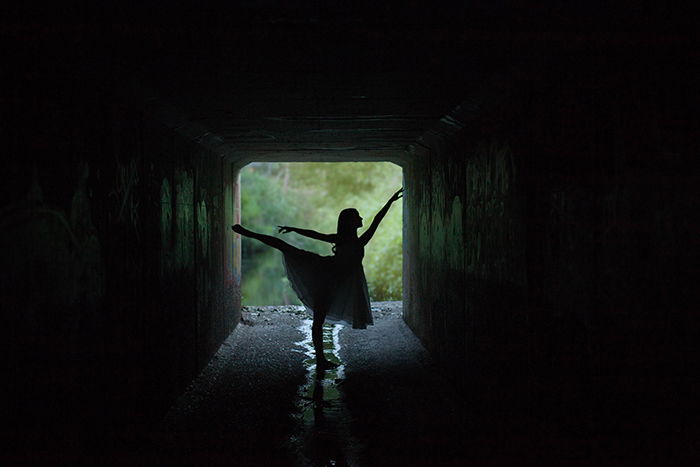
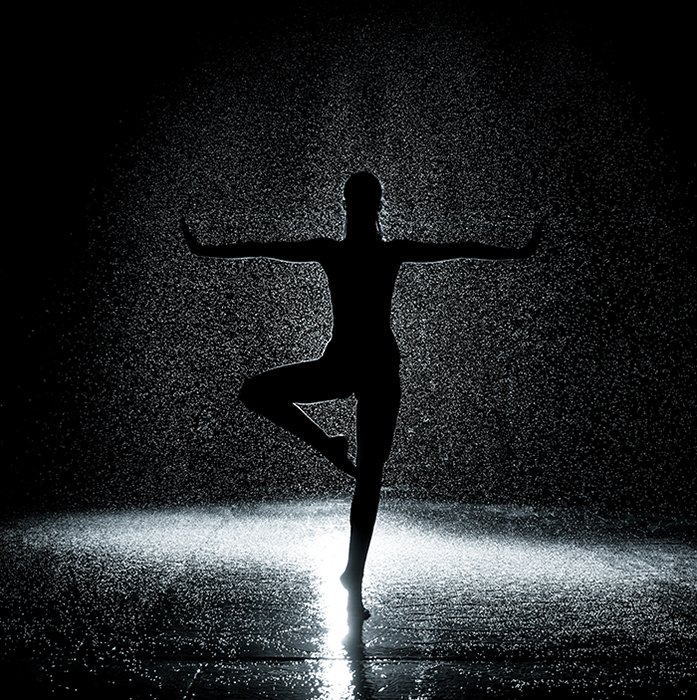
3. Use One Source of Light to Create Breathtaking Silhouettes
Ballet photography often focuses on movements and shapes. This makes it the perfect genre for silhouette photography enthusiasts. To make a silhouette, have your model stand in front of a bright light source. This can be a stage light or a big torch. Make sure there are no other light sources in your studio. The less surrounding light there is, the easier it will be to emphasise your model’s movements. If you want to make your photos even more creative, use water, dust, feathers, or fake snow. These will fill in negative space and make your portraits look more atmospheric.
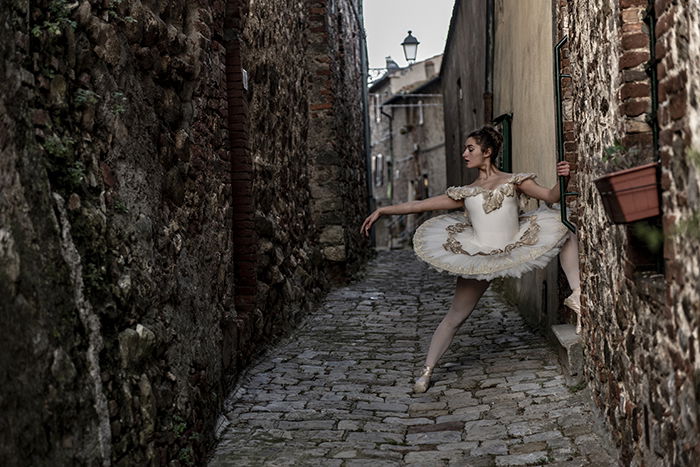
2. Take Photos Outdoors to Avoid Boring Photoshoots
Many ballet photos are taken indoors for the sake of comfort. Taking photos in a studio or theatre all the time can get very boring for both you and your model. To make your shoot more inspiring, take photos in a peaceful outdoor space. An alley, a garden, and a field can all help you take ethereal portraits.
1. Experiment With Flour to Create Surreal Ballet Portraits
Flour is often used in dance photography to create surreal photos. Flour photography requires a ventilated space, a dark background, lots of flour, and cleaning tools. This technique is messy. But it will help you take very creative and unusual photos of your subjects.
Best Ballet Photography Poses
Ballet photography can be captured in many ways. You can go to a ballet show, photograph a recital, or have an individual photoshoots with one or two models. It’s likely that you’ll be able to photograph these poses during a show or recital. But you’ll find it easier to capture them during a one-on-one shoot with a professional ballerina.
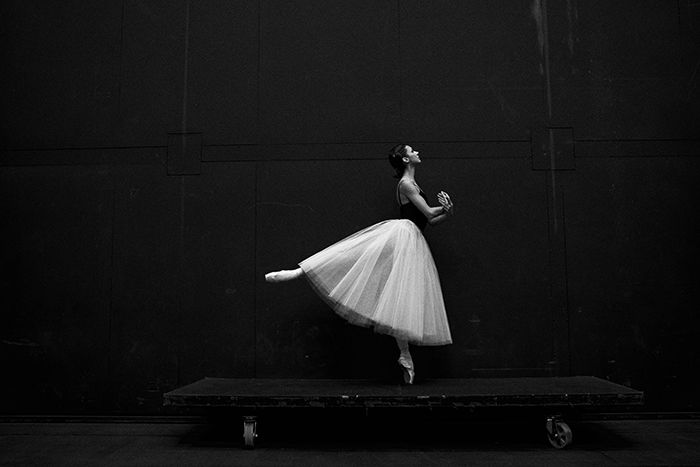
6. First Arabesque
First Arabesque is one of the most popular and elegant ballet poses. The model has to stretch one leg away from their body and balance on the other. Their arms can be held up in a variety of ways. This pose is ideal for fairytale-inspired photoshoots. Because the pose is so visually appealing, you can emphasise it with the help of silhouettes.
5. Split Leap
A split leap is a powerful pose that will help your model express themselves freely. There’s only a limited amount of split leaps a ballerina will be able to do before he or she gets tired. Use these opportunities wisely. This pose requires a knowledge of action photography. Make sure you familiarise yourself with aperture, shutter speed, and ISO before your shoot.
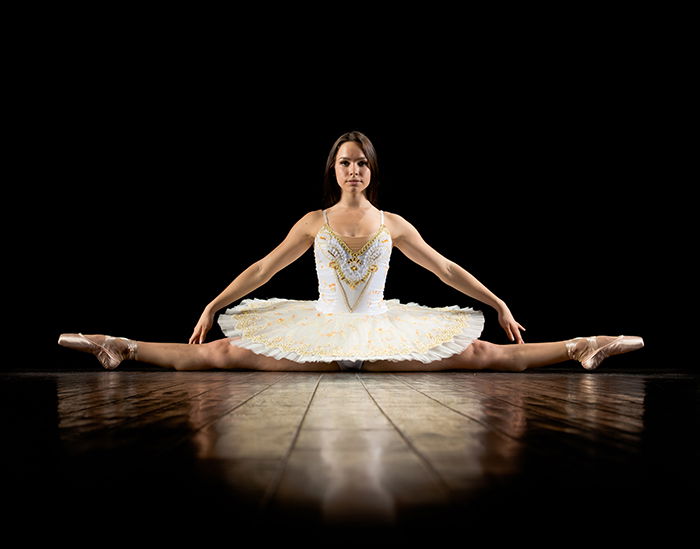
4. Sitting Splits
A ballerina’s flexibility can help you take mesmerising and unusual portraits. You can use splits to create a symmetrical composition and make your photos look balanced. Splits come in two common forms: side splits and front splits. Both can be done while sitting or jumping. Unlike split leaps, sitting splits will help you avoid exhausting your model. You’ll have lots of time to take the perfect shot. This is ideal for ballet photography beginners.
3. Mid Pirouette
This pose is simple but very fun to work with. Photograph your subject as they do a pirouette. Unlike sitting splits, pirouettes won’t give you lots of time to prepare. Take a few simple photos before or after every difficult pose. This way your model will have enough time to catch their breath.
2. One Leg Outstretched, Hands Below Chest
Similar to First Arabesque, this graceful pose is perfect for emotional ballet portraits. One key difference is that your model will have to stand on their toes. This pose will emphasise your model’s outfit, especially if they’re wearing a long skirt. And it’ll give you yet another opportunity to work on your composition skills.
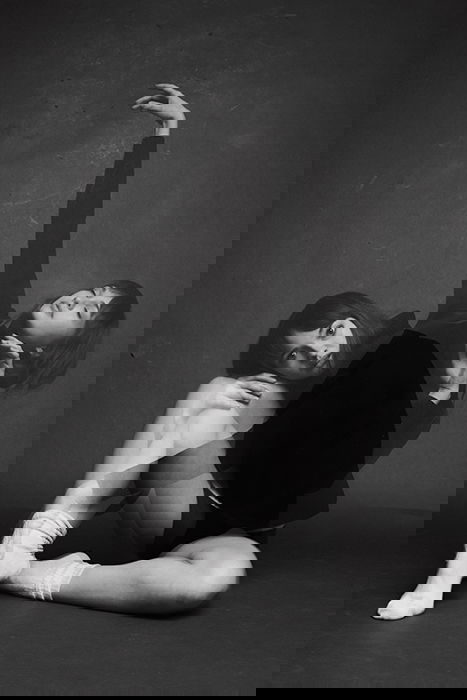
1. Cross Position
This position involves stretching both arms away from the body and balancing one leg on the other. It creates a shape similar to a cross.
Conclusion
Ballet photography is different to portrait photography and all of its sub-genres. In addition to photographing faces, you have to pay attention to posture, composition, and movement. What makes ballet photography fulfilling is that it’s both challenging and fun. As long as you’re familiar with a few photography tips and poses, you’ll be able to enjoy this elegant photography genre and take professional photos at the same time.


title: “Best Ballet Photography Poses And Tips” ShowToc: true date: “2023-02-20” author: “Stephen Adams”
Ballet Photography Tips
6. Emphasise Movement Using Motion Blur
Motion blur works very well with ballet photography. If you’re a fan of abstract art, you can experiment with blur in a variety of ways. One of the most popular motion blur techniques involves long exposure. Place your camera on a tripod to avoid unnecessary hand movements. Make sure your aperture is high and your shutter speed slow. If you’re new to shutter speed, you can switch to Bulb Mode (B on the Mode Dial). This will allow you to hold the shutter open for as long as you like. You’ll control when your shutter closes. This means you can take photos for 10 seconds, 10 minutes, or any other amount of time.
5. Create a Double Exposure for Extra Creative Results
Double exposure photos are often made up of at least two images that complement each other. You can use this technique to capture multiple movements in one composition. This is a great way to express your subject’s emotions and show off a variety of poses in one photo. Double exposures look complicated. But they’re relatively easy to make. You need at least a couple of photos, Photoshop (or a similar editing program), basic composition skills, and the layer opacity tool.
4. Focus on Details to Make Your Photos Look More Interesting
When you think of ballet photography, you might picture full body shots only. If you stick to one type of angle or position, your photos are going to end up looking dull. Be as flexible as possible when you photograph your model. One way to make things more exciting is to focus on details. Take photos of your subject’s hands, accessories, outfit, shoes, etc. While these photos may not become your favourites, they’ll definitely improve your observation skills and give your model lots of beautiful photos to enjoy.
3. Use One Source of Light to Create Breathtaking Silhouettes
Ballet photography often focuses on movements and shapes. This makes it the perfect genre for silhouette photography enthusiasts. To make a silhouette, have your model stand in front of a bright light source. This can be a stage light or a big torch. Make sure there are no other light sources in your studio. The less surrounding light there is, the easier it will be to emphasise your model’s movements. If you want to make your photos even more creative, use water, dust, feathers, or fake snow. These will fill in negative space and make your portraits look more atmospheric.
2. Take Photos Outdoors to Avoid Boring Photoshoots
Many ballet photos are taken indoors for the sake of comfort. Taking photos in a studio or theatre all the time can get very boring for both you and your model. To make your shoot more inspiring, take photos in a peaceful outdoor space. An alley, a garden, and a field can all help you take ethereal portraits.
1. Experiment With Flour to Create Surreal Ballet Portraits
Flour is often used in dance photography to create surreal photos. Flour photography requires a ventilated space, a dark background, lots of flour, and cleaning tools. This technique is messy. But it will help you take very creative and unusual photos of your subjects.
Best Ballet Photography Poses
Ballet photography can be captured in many ways. You can go to a ballet show, photograph a recital, or have an individual photoshoots with one or two models. It’s likely that you’ll be able to photograph these poses during a show or recital. But you’ll find it easier to capture them during a one-on-one shoot with a professional ballerina.
6. First Arabesque
First Arabesque is one of the most popular and elegant ballet poses. The model has to stretch one leg away from their body and balance on the other. Their arms can be held up in a variety of ways. This pose is ideal for fairytale-inspired photoshoots. Because the pose is so visually appealing, you can emphasise it with the help of silhouettes.
5. Split Leap
A split leap is a powerful pose that will help your model express themselves freely. There’s only a limited amount of split leaps a ballerina will be able to do before he or she gets tired. Use these opportunities wisely. This pose requires a knowledge of action photography. Make sure you familiarise yourself with aperture, shutter speed, and ISO before your shoot.
4. Sitting Splits
A ballerina’s flexibility can help you take mesmerising and unusual portraits. You can use splits to create a symmetrical composition and make your photos look balanced. Splits come in two common forms: side splits and front splits. Both can be done while sitting or jumping. Unlike split leaps, sitting splits will help you avoid exhausting your model. You’ll have lots of time to take the perfect shot. This is ideal for ballet photography beginners.
3. Mid Pirouette
This pose is simple but very fun to work with. Photograph your subject as they do a pirouette. Unlike sitting splits, pirouettes won’t give you lots of time to prepare. Take a few simple photos before or after every difficult pose. This way your model will have enough time to catch their breath.
2. One Leg Outstretched, Hands Below Chest
Similar to First Arabesque, this graceful pose is perfect for emotional ballet portraits. One key difference is that your model will have to stand on their toes. This pose will emphasise your model’s outfit, especially if they’re wearing a long skirt. And it’ll give you yet another opportunity to work on your composition skills.
1. Cross Position
This position involves stretching both arms away from the body and balancing one leg on the other. It creates a shape similar to a cross.
Conclusion
Ballet photography is different to portrait photography and all of its sub-genres. In addition to photographing faces, you have to pay attention to posture, composition, and movement. What makes ballet photography fulfilling is that it’s both challenging and fun. As long as you’re familiar with a few photography tips and poses, you’ll be able to enjoy this elegant photography genre and take professional photos at the same time.
